Anterior hip pain exercises: (a full write up with explanations later)
Here are some exercises which I would recommend for someone suffering from anterior hip pain related to psoas dysfunction:
Self Psoas release: Prone with a baseball/tennis ball pinning the psoas (or your fist). Lift your leg up to complete the pin/stretch.
Hip flexor stretch (Hold for 30-60 seconds): Make sure to tuck your pelvis under you, thereby flattening your lower back, to stabilize your spine and provide a base of which to stretch the muscle properly)
Plank 8x20 seconds, progress to 6x30 seconds, progress to 4x45 seconds, progress to 3x60 seconds. Listen to your body and listen to your physical therapist when to progress your exercises
Elevated bridge dips with a band around the knees. 3sets of 15 repetitions
side lying leg raise: 3 sets of 15 repetitions
side plank with clams: 3 sets of 15 repetitions.
You can perform all three sets of these exercises or you can circuit the exercises (plank-dips-leg raise-clams, plank-dips-leg raise-clam, plank-dips-leg raise-clam)
Here are some exercises which I would recommend for someone experiencing low back pain. These exercises should not hurt. If these exercises do bother you, I would suggest reviewing the videos to make sure you are doing it properly, and consult a physical therapist or your medical doctor.
Bridge 2-3x (10x10sec hold) . Try and get your heels as close as you can to your bottom. Start by pulling your belly button in to your spine. Dig your heels into the ground to activate your quadriceps and turn your hamstrings off (especially if your get a hamstring cramp). The motions should be lift your toes up, pull belly button in, lift slowly, and lower slowly.
HS stretch 2 minute stretch
calf stretch 60 second hold
side lying leg raise 3x15
clams 3x15
Plank 8x20sec. progress to 6x30sec. Progress to 4x45 sec. Progress to 3x1min
Here are some exercises designed for a general rotator cuff tear. These are somewhat advanced exercises, so be aware, you should NOT have any pain while doing these exercises. If you have any pain with these exericses, avoid the exercise and contact your physical therapist or medical doctor. All rotator cuff exercises must begin with strengthening the scapula. If the scapular muscles are not strong, then the shoulder muscles and namely the rotator cuff will have to work even harder to compensate for the weakness.
Scap Squeezes to be performed throughout the day. 5x10. Either form will work. If you don't have a band, if you lie down on the floor facing down, you can perform the second version of this exercise.
Rows. A very important exercise to work the scapular stabilizers. Try to squeeze your shoulder blades together first prior to performing the row. This is called setting the scapula prior to performing the exercise. 3x15
Prone Y. This one may hurt, so be aware that you shouldn't have any pain. The goal with this exercise is to squeeze the shoulder blades together down your back. 3x10
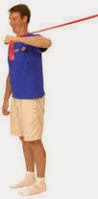
Prone T: Here are two forms. One where you hold the position and one where you lift the arms up and down. For a hold, try to hold the position for 20-30 seconds. For repetitions, try to perform 3x15.
Also, there are two ways to do the exercise and it is recommended that you do both. Once with your thumbs pointed up toward the ceiling as seen in this first video. And once with your thumbs pointed down toward the ground as seen in the third video.
Wall angels. This exercise starts to incorporate range of motion of the shoulder while using scapular stability. Perform this exercise slowly and deliberately. 3x10
ER at 0. I prefer this to be eccentric in the early stages of treatment, but without showing you how to do this, it could get confusing. So as long as this doesn't cause you any pain, then it can be done this way. 3x10
ER at 90. Again, this should not cause you any pain. Try 3x10
This is the history of a young athlete who fell backward and
caught himself by falling onto his elbow.
He reports having his shoulder pop
out of its socket and breaking the major bone in his arm. (We would call it a Left
shoulder anterior dislocation compounded with a 3 part Fracture of Left Humerus).
He reports having some muscle atrophy/wasting and some possible resection of
muscles during ORIF Surgery to stabilize fracture.
After the surgery he felt
some unstable motions from subtle movements for a few months which he doesn’t
feel anymore. Physical therapy gave him a few exercises, which he performed
with band and did a lightly weighted pendulum for exercise.He also included self-stretching. One year
later he had an additional surgery to remove the internal fixation (pins,
screws, and metal plates that were used to stabilize the area). He says he
feels more mobility after the second surgery, which he reports as a good thing. He reports that now, he feels
overall 75% better from the time of the accident.Currently he is not comfortable doing active
sports or doing anything to threaten another shoulder dislocation. “I don’t try
to exert my arm much. I feel that the motion is pretty normal.I can sleep on my left side in a modified position
without pain. But wearing a backpack
irritates the surgical site and I have not done a push-up or pull-up yet.” He
says he can pick up heavy objects, but he doesn’t risk it by trying anything
crazy. His goal is to do push-ups and pull-ups and is interested in developing
a strengthening program so that he can feel normal again.
When I see a history like this, my first thought goes to the
structure of the shoulder itself.So
lets talk about that first.The shoulder
is made up of essentially two bones, the humerus and the scapula (shoulder
blade). The shoulder blade is connected to the body primarily with muscles, but
does have one bone-bone joint, but that is beyond the purpose of this article.
The shoulder blade, where it connects to the shoulder is
called the glenoid.
We all know from
experience that the shoulder was built for full range of motion, so that we can
reach overhead, behind us, across our body, etc.Anatomically we can see this by looking at
the congruency of the humerus to the glenoid.The best analogy that I can give for this joint is the humerus is to the
glenoid as a golf ball is to a tee.
There really isn’t much congruency between the
two bones, which means that without proper muscle control, the shoulder would
literally just fall out.There is a
jelly like structure which surrounds the edge of the glenoid, called the
labrum. The labrum increases the congruency of the two bones, and provides some
passive stability to the shoulder by acting like glue. Often times when there
has been a dislocation, or a fracture and dislocation, there will be some
damage to the labrum.
As I mentioned,
the glenoid labrum provides some (albeit minimal) passive stability to the
shoulder, so a tear within the labrum, could lead to a person feeling constantly
unstable. There are some that say that a labral tear is very painful, and there
are others that say that the labrum doesn’t have many nerve endings and
therefore isn’t that painful.But in the
case of this patient, there was no mention of a labral tear, and we must assume
the doctors would notice if there was one, so we will leave this issue for now.
I want to repeat (to stress importance) that without proper
muscle function, the shoulder would just fall out.Therefore, I want to take a minute to
describe what proper muscle function is, and maybe a little about the anatomy
of the shoulder.The body, when talking
about muscles, could be divided into different categorizations.Stabilizing vs mobilizing/movers. Superficial
vs deep. Large vs small. One joint vs two joint. When talking about feeling
unstable, we will consider the classification of stabilizers vs movers (Or
mobilizers, which sounds way better). The larger muscles of the shoulders,
namely the showy ones which you see most body builders working out –
pecs
(pectoralis major)
lats (latissimus dorsi)
delts (deltoids),
biceps, triceps
are considered the movers or mobilizers of the shoulder. The smaller, deeper muscles – infraspinatus,
supraspinatus, subscapularis, teres minor –
are a part of the rotator cuff and
are used for stabilizing the shoulder.
When a shoulder pops out the front of the body, we call it
an anterior dislocation. If the shoulder goes back in on it’s own, we don’t
call it a dislocation but a subluxation. In order to protect the shoulder from future anterior subluxations or
dislocations, we need to strengthen the muscles on the front of the shoulder.It is more important to target strengthening
the stabilizers than strengthening the movers during rehabilitation.If we use a heavy weight, we will be
targeting the movers of the shoulder and not the stabilizers. In fact, if we do
strengthen the movers without working on the stabilizers, then the shoulder
will be forced to move in too great of motion and would likely cause pain.
Here’s an example of what I mean: Sign your name on a piece
of paper.Now, grip the pen in your fist
as if you were going to stab it down onto the table.Now try to write your name without moving
your wrist.It is much more
difficult.If you successfully wrote
your name, congratulations.Likely
though, you struggled quite a bit.That
is because you wrote your name using your movers and not the little stabilizers
of the hand and fingers.
Where am I going with this? When the shoulder dislocates
forward as in the case of our patient, the front muscle – the one most
congruent with the shoulder and the one most responsible for protecting the
shoulder (the subscapularis) - gets rapidly stretched and traumatized.
This is followed with an inflammatory
response within the joint, which causes all the muscles surrounding the joint
to go into a state of shock or involuntary contraction.That is why it is necessary to redevelop
complete range of motion within the shoulder prior to really beginning
strengthening.However, with the case of
anterior dislocation, we want to make sure that we don’t neglect the
strengthening aspect of recovery, so that the muscles can do their job in
protecting the shoulder from further dislocations.Since the muscles are responsible for holding
the shoulder together - even more than the joint capsule or few ligaments.
In conclusion, specific strengthening of the rotator cuff
and namely the subscapularis is important to protect the shoulder from further
dislocation and properly rehabilitate the shoulder.
Following are some exercises for recurring anterior
dislocations of the shoulder. These exercises are general and not specific to
any specific person, but rather are exercises that specifically target the
subscapularis when performed correctly.If you try these exercises at home, you should not be experiencing any
pain, but in the case that you do, please stop the exercises and consult a
professional.
Reminder: You have many muscles that produce the movement of
Internal Rotation so it is important to start with light weight and do many
repetitions.As mentioned before, the
muscles in your body can be divided into movers and stabilizers, and we are
targeting the stabilizers with these exercises.Although it is impossible to separate out the stabilizers without using
the movers, it is the stabilizers that should be the first to respond.The movers typically respond more (or may
even overcompensate) when the weight is heavier or moved at a rapid speed.Don’t be ashamed to start light and slow and
move up in weight. Recommendation: Only to move up in weight when 60-100
repetitions (it could be 3-5 sets of 20 repetitions) are easy to do.The number of repetitions per set should be
no less than 15. If 15 repetitions are difficult, then the weight is too heavy.
1.IR at 0 degrees with a TB
2.IR at 90 degrees with a TB
3.Supine shoulder press/angels (elbows bent to 90
degrees)
4
D2 extension with a TB. Thumb back when the arm
is overhead, and thumb back when the arm is across the body by the opposite
hip.The elbow should remain relatively
straight (but not locked out) or very slightly bent. The TB should be tied to
the top of a door behind you.
5.Flys (again, the tendency would be to go heavy,
so start really light for the sake of your stabilizers)
6.Wall Push ups, progressing to table push ups,
progressing to floor push ups
7.Military push ups (down-dog to up-dog)
8.Windmill (front plank to side plank)
Alphabet Laser pointing (to the side): A
proprioception exercise to regain brain/shoulder control. Try to keep your elbow straight as you do this activity. It can be done forward or to the side. If you don't have a laser pointer, you can just trace it with your finger. Use a laser pointer and trace a picture like this:
Turkish
get ups (start with only using a phone book or a thick hard back book. Try to
balance the book on your fist while keeping your thumb tucked in your fist to
avoid cheating. It can be done, I promise.This is also more of a coordination exercise to work on proprioception
and control. Add weight only when you
master balancing a book on your fist.
Advanced
exercise: Wall walks: push up to handstand
Advanced
exercise: push up in a handstand
Of
course if you have other problems or issues with your shoulder (for example:
from the result of a fall, or fracture, or accident, you should consult your
local physiotherapist for the exercises that are best geared for you.)